You just had sod installed. It looked incredible on day one — deep green, lush, exactly what you pictured. Then a few days later you notice it. A strip of brown along a seam. A patch near the fence line that doesn’t look quite right. Maybe a whole section that seems to be fading.
Before you panic, take a breath. Some color variation in new sod is completely normal. But some of it is a warning sign that needs attention quickly — because unlike an established lawn, new sod has almost no margin for error in those first two weeks. It doesn’t yet have roots reaching into the soil beneath it, which means it’s entirely dependent on surface moisture to stay alive. When something goes wrong, it goes wrong fast.
Here’s how to tell the difference, what causes browning in new sod, and what we do differently to prevent the most common problems before they start.
First: What’s Actually Normal in New Sod
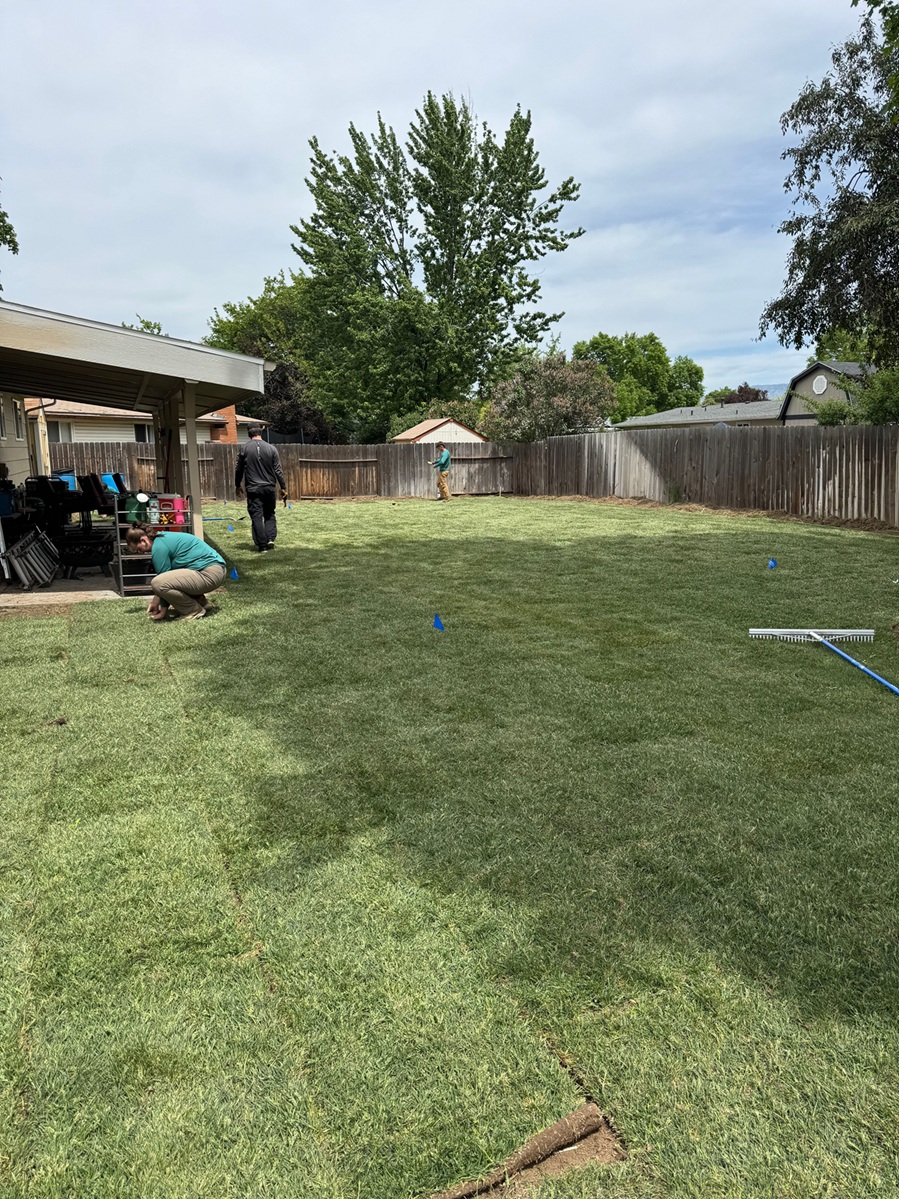
Sod goes through a real transition when it’s cut, rolled, and transported — even when it’s harvested fresh that same morning, which is exactly why we source exclusively from Cloverdale Nursery, who cut and harvest daily right here in the Treasure Valley. Even with the freshest sod available, you may notice a slight color change near the seams between rolls in the first few days. This is normal. The edges of each roll experienced the most handling and are the first to show any stress.
What matters is what those seams look like after the first week. If they green back up as the sod establishes and roots begin working their way down — which they should by day five in a properly watered lawn — you have nothing to worry about. If the seams stay brown or get worse, that’s a different story, and we’ll get to that in a moment.
The Most Common Cause of Brown Sod: Not Enough Water
The overwhelming majority of brown sod we see — whether it’s a lawn we installed or one a homeowner calls us about after someone else did the work — comes down to one thing: not enough water, applied incorrectly.
New sod requires a completely different watering approach than an established lawn, and most sprinkler timers are set up for established lawns. A typical Treasure Valley homeowner might have their controller set to run 20 or 30 minutes every two or three days. That schedule will kill new sod.
How We Set Up Watering on Installation Day
When we finish an installation, the first thing we do before leaving is run the sprinklers for an extended initial soak — typically an hour or longer. The goal is to saturate not just the sod itself but the soil underneath it, giving the roots something moist to grow toward from day one. We watch the coverage as it runs, checking every zone to make sure the entire lawn is being reached.
After that initial soak, the goal shifts to maintaining consistent moisture without letting the surface dry out. We set the timer to run multiple shorter cycles throughout the day — typically three to four times daily, for ten to fifteen minutes at a time. This keeps the sod moist without drowning it.
That said, no two irrigation systems are the same. A homeowner on pressurized irrigation with strong water pressure may achieve excellent coverage in ten minutes. Another homeowner on city water with lower pressure may need fifteen or twenty minutes per cycle to deliver the same amount of water. We account for this when we set the timer — it’s not a one-size-fits-all number.
Where Browning Starts — and What It Tells You
When new sod doesn’t get enough water, it doesn’t usually turn brown all at once. It starts in the spots that receive the least coverage first. This is almost always the edges and corners of the lawn, areas at the outer reach of a sprinkler head’s pattern, or any zone where two sprinkler heads don’t overlap quite enough to give consistent double coverage.
This is why one of the first things we do before any installation — before we touch a single tool — is turn the sprinklers on and watch. We’re looking at coverage, overlap, and any dead spots in the pattern. Good overlap means that even the areas getting the least water are still getting enough. Even with careful observation and a well-designed system, no lawn gets perfectly uniform coverage everywhere. Any area receiving slightly less water will start to show it before the rest of the lawn does. Those spots may need hand watering to supplement the sprinkler system until the lawn is established, and we tell our clients this upfront.
The Checkerboard Pattern: A Sign of Poor Installation
There’s a specific type of browning that has nothing to do with watering — and it’s entirely the result of how the sod was installed. If you’ve seen a lawn about a week after installation that looks like a checkerboard, with brown lines running in a grid pattern across the grass, you’ve seen what happens when sod edges aren’t properly mended during installation.
Sod in Idaho is delivered in rolls. When those rolls are unrolled and laid down, the leading and trailing edges naturally curl upward from being rolled. Many installers lay the sod and move on without addressing those curled edges. We don’t.
Our team manually works every edge down — pressing and mending each curled edge flush against the soil as we go. It takes more time, but it solves a serious problem. When an edge curls up, even slightly, the underside of the sod along that edge loses contact with the soil. No soil contact means no moisture reaching those cells, which means no root growth, which means those edges dry out and die. A week later, every seam in the lawn has a visible brown line running through it.
This is something Cody — who has years of experience in professional turf management — made a non-negotiable part of how we work. It’s called mending, and the difference it makes is visible within days of installation. If you’re evaluating sod installers and want to know whether they do this, just ask. The ones who do will know exactly what you’re talking about.
Our Follow-Up Visits: You’re Not on Your Own After Installation Day
One of the things that sets our sod installations apart is that we don’t hand you a watering schedule and disappear. We come back.
The 5-Day Visit
Around five days after installation, we return for a visual inspection of the entire lawn. By this point, the sod should already have some early roots working their way down into the soil — it shouldn’t be lifting. We walk the perimeter carefully, pressing our hands into the grass along the edges to check moisture and firmness, observing color across the full lawn, and looking for any areas that are drying out or showing early stress. We avoid walking across the lawn itself at this stage — a wet, newly installed lawn is soft enough that foot traffic can leave depressions in the grass, and we’re not going to do that to a lawn we just installed.
If watering needs adjustment — more coverage in a dry corner, a longer run time on a zone with weaker pressure, hand watering in a spot the sprinklers aren’t quite reaching — we handle it at this visit. We also check to make sure the lawn isn’t being overwatered, though in our arid Treasure Valley climate that’s a far less common problem than underwatering.
The 14-Day Visit
At around two weeks, we come back for what is usually the most satisfying visit — the one where a homeowner sees their lawn has truly taken hold. By this point, for spring and fall installations, the roots should be well established in the soil below. We do a proper tug test, pulling gently at a corner of the sod to confirm resistance, and check the overall health and color of the lawn.
If everything looks good — and it usually does — this is when we adjust the sprinkler timer back down to a normal watering routine. The intensive new-sod schedule has done its job. From here, the lawn transitions to a standard maintenance schedule appropriate for the season.
This is also when we talk about mowing. Once the sod is firmly rooted and the lawn has had its two weeks, it’s ready for its first cut. If you’d like us to take care of that — and ongoing weekly maintenance going forward — our residential lawn maintenance service covers Boise, Meridian, Eagle, Garden City, and Kuna. Many of our sod clients become regular mowing clients, and it’s a natural transition.
A Word on Summer Installations
Everything above applies year-round, but summer installations in Boise’s heat require extra vigilance. High temperatures accelerate moisture loss from the sod surface, which means the watering schedule needs to be more aggressive and the monitoring more frequent. If you’re having sod installed in July or August and you notice browning developing faster than expected, increase your watering frequency before assuming the worst. Heat stress in new sod looks very similar to underwatering — because in a sense, it is.
Our follow-up visits become especially important during summer installs. If there’s a concern between our scheduled checks, don’t hesitate to call us.
When to Actually Worry
Here’s a straightforward way to think about it. In the first few days, minor color variation near seams is normal. By the end of the first week, the lawn should be looking consistently green and healthy across most of its surface. Any brown that’s spreading rather than shrinking — particularly if it’s appearing in the middle of rolls rather than just at the edges — is a sign that something needs to change with watering, and quickly.
If you have sod installed by Alive & Green, you won’t be left to figure this out alone — that’s what our follow-up visits are for. If you had sod installed by someone else and you’re seeing concerning browning, give us a call. We’re happy to take a look.
And if you’re still in the planning stage and want to understand the full installation process before you commit, our guide to sod installation in Boise, Idaho covers everything from soil prep to grass variety to what the finished result should look like.
1-208-398-0357
Request a free quote at Alive-Green.com